Insider Threats in Office 365: When the Call Is Coming from Inside the Tenant
Insider threats in Office 365 rarely look like a film villain in a hoodie. They look like Dave from accounts emailing the payroll spreadsheet to the wrong Dave, or a sales manager who resigns on Monday and downloads the client list on Tuesday.
Every one of those people already has a valid account, a compliant laptop and permission to open the files. Your firewall waves them straight through, because as far as it is concerned, they belong there.
Microsoft 365 has a good toolkit for insider threats, spread across Microsoft Purview, Microsoft Entra ID and Defender. The catch is that it lives in four portals with four sets of licence footnotes.
This guide to insider threats in Office 365 covers the four types of insider, the warning signs, the licensing, and seven steps to detect and prevent insider threats. There is also a PowerShell check you can run today to find mailboxes quietly forwarding mail to Gmail.
Never miss a guide: subscribe here and check out my YouTube channel.
The short version (for anyone reading this while HR waits outside the server room)
- Insider threats come in four flavours: accidental, negligent, malicious and compromised. Most incidents are the first two.
- Lock down identity first: MFA through Conditional Access, risk-based policies, and PIM for every admin role.
- Turn off automatic external forwarding and run the PowerShell check below to find anything already leaking.
- Publish one good DLP policy with policy tips before you touch Insider Risk Management.
- Insider Risk Management needs Microsoft 365 E5, Microsoft Purview Suite or the E5 Insider Risk Management add-on, and it hides usernames by default.
In this guide
What are insider threats in Office 365?
Insider threats are risks caused by people who already have legitimate access to your data: employees, contractors, partners, volunteers and, in schools, students.
They also include compromised insiders, where an attacker is using a real user’s account. From the tenant’s point of view, that attacker is an insider with a very convincing badge.
Motives range from honest mistakes and convenience to money, grievance and plain curiosity. Here are the four types, roughly in order of how often they ruin your Friday.
1. Accidental insiders
Well-meaning users who cause harm by mistake.
- Sending a spreadsheet of personal data to the wrong external contact.
- Creating an “Anyone with the link” share in SharePoint or OneDrive and pasting it into a supplier email.
- Pasting sensitive text into a Teams chat that includes external guests.
Impact: data exposure, breach notifications and some very uncomfortable meetings.
2. Negligent insiders
Users who know the rules and bend them for convenience, without meaning any harm.
- Auto-forwarding work email to a personal address “to make working from home easier”.
- Downloading files to an unmanaged device that should never hold them.
- Approving an unexpected MFA prompt just to make it go away.
Impact: slow, silent data leakage and a culture of exceptions that makes risky behaviour feel normal.
3. Malicious insiders
Users who intend to cause harm or profit from access they already have.
- Mass downloading from SharePoint before leaving, then copying files to personal cloud storage or USB.
- Creating inbox rules that forward mail externally or hide replies in an obscure folder.
- Consenting a rogue app to high-privilege Microsoft Graph permissions, or adding a back-door admin role.
Impact: data theft, sabotage, extortion and possible legal action.
4. Compromised insiders
A legitimate account abused by an external attacker, usually after phishing, MFA fatigue or token theft. The attacker creates forwarding rules, registers OAuth apps or invites guests, all from an account you trust.
Impact: it looks like normal user activity, so it can go unnoticed for weeks.
Good to know: compromised accounts are why identity controls sit in the same plan as data controls. If you only watch the files, you can’t tell Dave from someone pretending to be Dave.
Early warning signs of insider threats in Office 365
None of these prove anything on their own. Together, and especially near a resignation date, they deserve a second look.
- Spikes in file downloads, deletions or sharing link creation.
- New inbox rules that forward externally or move messages to folders like RSS Feeds.
- New consent to permissions such as Mail.ReadWrite or Files.Read.All.
- Sign-ins from non-compliant devices, unfamiliar countries or at three in the morning.
- Large exports or eDiscovery searches by people whose job involves neither.
- A sudden burst of guest invitations or external Teams sharing.
The Microsoft tools that stop insider threats in Office 365
Here is which tool helps with which type of insider. Think of it as the cast list before the plot.
| Tool | Accidental | Negligent | Malicious or compromised |
|---|---|---|---|
| Purview DLP (including Endpoint DLP) | Policy tips and blocks on oversharing | Enforces rules users keep bending | Blocks or quarantines exfiltration |
| Purview Insider Risk Management | Spots risky patterns | Scores repeat behaviour | Alerts on data theft near a leaving date |
| Conditional Access and ID Protection | Requires compliant devices | Restricts risky contexts | Blocks or challenges risky sign-ins |
| Entra PIM and access reviews | Removes stale access | Removes standing admin rights | Contains admin misuse |
| Purview Audit | Investigates incidents | Shows trends | Builds evidence |
| Defender for Cloud Apps | Flags unusual sharing | Shows shadow IT | Behavioural anomaly alerts |
| Microsoft Sentinel (optional) | Central reporting | Central reporting | Correlation and automated response |
Prerequisites and licensing
This is where most projects to tackle insider threats in Office 365 stall, usually right after someone opens the licensing PDF. Here is the short version.
| Feature | What you need |
|---|---|
| Conditional Access | Microsoft Entra ID P1 (in Business Premium, E3 and E5) |
| Risk-based Conditional Access and PIM | Microsoft Entra ID P2 (in Microsoft 365 E5) or Entra ID Governance for PIM |
| Access reviews | Entra ID P2 for the core features, ID Governance for the extras |
| DLP for Exchange, SharePoint and OneDrive | Microsoft 365 or Office 365 E3/E5, or Business Premium |
| DLP for Teams chat and Endpoint DLP | Microsoft 365 E5, Microsoft Purview Suite or E5 Information Protection and Governance |
| Insider Risk Management | Microsoft 365 E5, Microsoft Purview Suite (formerly Microsoft 365 E5 Compliance) or Microsoft 365 E5 Insider Risk Management |
| Audit | Standard keeps 180 days; E5 users get one year for Entra, Exchange, SharePoint and OneDrive |
Roles matter too. Configuring Insider Risk Management needs the Insider Risk Management or Insider Risk Management Admins role group. Seeing alerts needs Analysts or Investigators, which Global Administrators don’t get by default.
How to stop insider threats in Office 365 in 7 steps
Do these in order. Each step makes the next one quieter, and Insider Risk Management works far better once the basics stop generating noise.
Step 1: Tighten identity with Conditional Access
Start with controls that cover all four types of insider threats in Office 365 at once. In the Microsoft Entra admin centre, go to Entra ID > Conditional Access > Policies.
- Require MFA for all users, and phishing-resistant MFA for admins.
- Block legacy authentication.
- Require a compliant device for SharePoint, OneDrive and Exchange.
- Create separate sign-in risk and user risk policies (P2), starting in Report-only.
Exclude your break glass accounts from anything that blocks sign-in, and test each policy with the Conditional Access What If tool first.
Gotcha: the legacy user risk and sign-in risk policies in ID Protection were scheduled to retire on 1 October 2026. If yours still live there, recreate them as risk-based Conditional Access policies and switch the old ones off.
Step 2: Put admins behind PIM and review access
A malicious admin is the worst kind of insider, and a compromised one is a close second. Remove standing access so a role only exists while someone is using it.
- Go to ID Governance > Privileged Identity Management > Microsoft Entra roles > Roles.
- Make Global, Exchange and SharePoint Administrator eligible rather than active.
- In Role settings, require MFA, justification and approval on activation, with a short maximum duration.
- Schedule access reviews for admin roles, guests and sensitive groups.
My Microsoft Entra PIM guide covers the settings in detail. Leave break glass accounts permanent active, or you may lock yourself out with your own good intentions.
Step 3: Block automatic external forwarding
Auto-forwarding is the oldest trick in the book for insider threats in Office 365, because it still works. Users do it for convenience, leavers do it on purpose, and attackers do it minutes after taking over an account.
- In the Microsoft Defender portal, go to Email & collaboration > Policies & rules > Threat policies > Anti-spam.
- Open Anti-spam outbound policy (Default).
- Set Automatic forwarding rules to the Off option, labelled “Forwarding is disabled”.
- If a team genuinely needs it, create a custom outbound policy for just those users.
Don’t leave it on the Automatic option, labelled “System-controlled”. Its behaviour depends on when your tenant was created, which is not a sentence anyone wants in an incident report.
Step 4: Publish a DLP policy with policy tips
Data Loss Prevention catches accidental and negligent insider threats in Office 365, which is most of them. Policy tips coach users at the exact moment they are about to do something daft.
- In the Microsoft Purview portal, go to Data loss prevention > Policies > Create policy.
- Pick a template from the Privacy or Financial category, or build a custom policy.
- Select Exchange, SharePoint and OneDrive, plus Teams chat and Devices if you have E5.
- Use Block with override for external sharing of sensitive content, with policy tips on.
- Run it in simulation mode for a week, then tune it before turning it on.
Tip: in the rule’s Incident reports settings, give genuine exfiltration a High severity. Insider Risk Management’s Data leaks policies only pick up high severity DLP alerts.
Step 5: Turn on Insider Risk Management
Insider Risk Management correlates audit logs, device activity and HR signals into a risk score, then raises alerts you can turn into cases. It is the closest Microsoft 365 gets to noticing that something feels off.
- Add analysts and investigators to role groups under Settings > Roles and groups in the Purview portal.
- On the Insider Risk Management Overview page, run the analytics scan. Results can take up to 48 hours.
- Set up the HR connector under Settings > Data connectors so resignation and last working dates arrive from a CSV.
- Go to Policies > Create policy and choose the Data theft by departing users template.
- Add a second policy from the Data leaks template, linked to your high severity DLP policy.
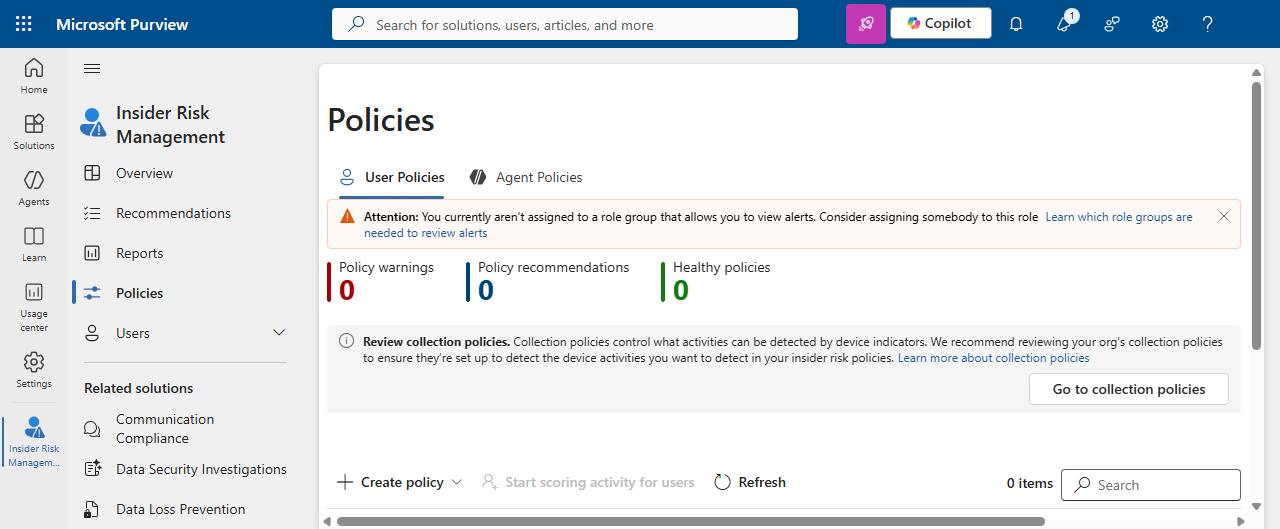
The HR connector is optional for departing users. Without it, the policy can trigger when the account is deleted from Microsoft Entra ID, which arrives rather late in the story.
Other templates include Data leaks by priority users, Data leaks by risky users, Security policy violations and Risky AI usage. The full list is on the policy templates page.
Good to know: usernames are pseudonymised by default, so analysts see something like AnonIS8-988 rather than a real name. You can change this under Settings > Insider Risk Management > Privacy, but agree it with HR and legal first.
Step 6: Wire up audit and Defender for Cloud Apps
When something does happen, the audit log is your black box. Audit is on by default for most tenants, but check, because someone may have switched it off in 2019.
# Exchange Online PowerShell: True means audit log search is on
Get-AdminAuditLogConfig | Format-List UnifiedAuditLogIngestionEnabled
To search, open the Purview portal and go to Audit > Search. Save searches for inbox rule creation, permission changes, mass downloads and deletion spikes.
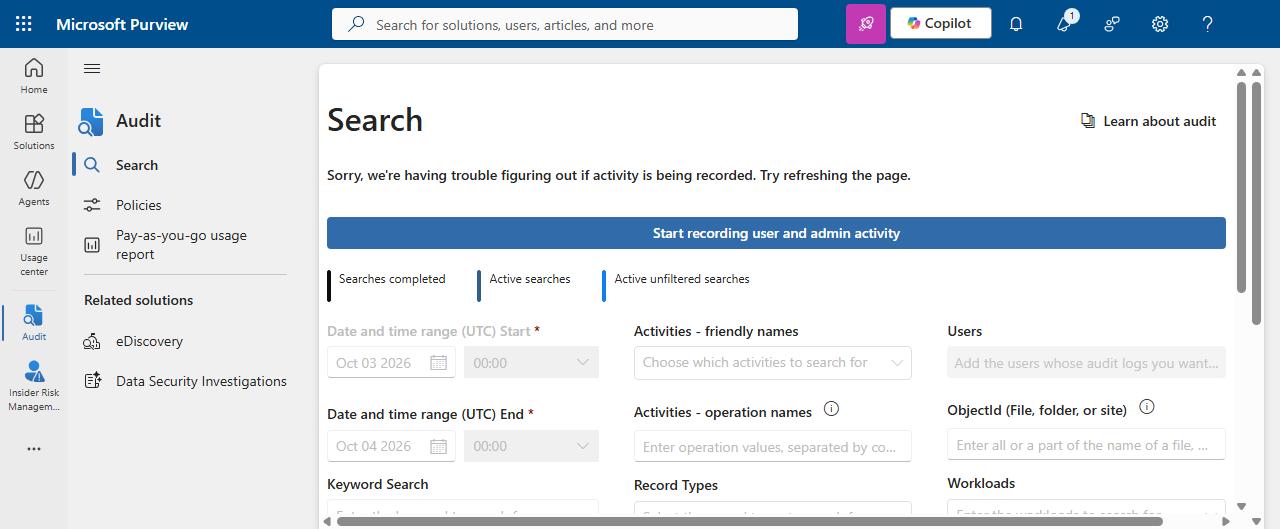
Then connect Microsoft 365 to Defender for Cloud Apps. Its built-in detections cover unusual downloads, unusual sharing, impossible travel and suspicious forwarding. If you run Microsoft Sentinel, connect Microsoft 365, Entra ID and Defender there too.
Step 7: Add Adaptive Protection
Adaptive Protection feeds the insider risk level from Insider Risk Management into DLP and Conditional Access. Low-risk users carry on, while high-risk users hit tighter controls automatically.
- In Insider Risk Management, open Adaptive Protection and define Elevated, Moderate and Minor risk.
- Add the “User’s insider risk level for Adaptive Protection is” condition to a DLP policy for Exchange, Teams or devices.
- Create a Conditional Access policy with the Insider risk condition set to Elevated and Block access, in Report-only first.
- Turn Adaptive Protection on. It can take up to 36 hours to start applying.
PowerShell check: find mail forwarding outside the organisation
This is the quickest win against insider threats in Office 365 in the whole guide. It checks every mailbox for admin-set SMTP forwarding and for Inbox rules, including hidden ones, that forward or redirect to a domain you don’t own.
# Find mailboxes and Inbox rules forwarding mail outside the organisation
Connect-ExchangeOnline
$internal = (Get-AcceptedDomain).DomainName | ForEach-Object { "$_".ToLower() }
$results  = [System.Collections.Generic.List[object]]::new()

foreach ($mbx in Get-EXOMailbox -ResultSize Unlimited -Properties ForwardingSmtpAddress, DeliverToMailboxAndForward) {

    # Mailbox (SMTP) forwarding, usually set by an admin
    if ($mbx.ForwardingSmtpAddress) {
        $address = "$($mbx.ForwardingSmtpAddress)" -replace '^smtp:', ''
        if ($internal -notcontains ($address -split '@')[-1].ToLower()) {
            $results.Add([pscustomobject]@{ Mailbox = $mbx.UserPrincipalName; Type = 'Mailbox forwarding'; Target = $address })
        }
    }

    # Inbox rules that forward or redirect, including hidden ones
    $rules = Get-InboxRule -Mailbox $mbx.UserPrincipalName -IncludeHidden -ErrorAction SilentlyContinue |
        Where-Object { $_.Enabled -and ($_.ForwardTo -or $_.ForwardAsAttachmentTo -or $_.RedirectTo) }

    foreach ($rule in $rules) {
        foreach ($t in @($rule.ForwardTo) + @($rule.ForwardAsAttachmentTo) + @($rule.RedirectTo)) {
            if ("$t" -match 'SMTP:([^\]]+)') {
                $address = $Matches[1]
                if ($internal -notcontains ($address -split '@')[-1].ToLower()) {
                    $results.Add([pscustomobject]@{ Mailbox = $mbx.UserPrincipalName; Type = "Inbox rule: $($rule.Name)"; Target = $address })
                }
            }
        }
    }
}

$results | Sort-Object Mailbox | Format-Table -AutoSize
$results | Export-Csv -Path .\ExternalForwarding.csv -NoTypeInformation
It compares each target against your accepted domains and exports a CSV. On a large tenant it takes a while, so run it with a cup of tea rather than at 4:55pm on a Friday.
Gotcha: Get-InboxRule doesn’t work for Global Reader or View-Only Organization Management, so run it as an Exchange Administrator. Rules that forward to a contact in your directory may not show an SMTP address, so check those by hand.
For an ongoing view, the Auto forwarded messages report in the Exchange admin centre shows who forwards externally. The compromised email account guide uses the same cmdlets if you need to dig deeper.
Prove it worked
- Send a test file with dummy sensitive data to a personal address and confirm the DLP policy tip appears.
- Add an external forwarding rule to a test mailbox, email it from outside, and confirm a 5.7.520 bounce.
- Run the PowerShell check again and confirm the list is empty or explained.
- Activate an admin role through PIM and confirm the approval request fires.
- Check the Insider Risk Management Overview page for analytics results after 48 hours.
Example scenarios
Example scenario: imagine a logistics firm where a sales manager resigns and the HR connector records the date. Two days later they upload client files to personal cloud storage. The departing users policy raises an alert, Endpoint DLP blocks the upload, and PIM means their old admin rights no longer exist.
Example scenario: imagine a secondary school where a teacher emails a pupil spreadsheet to a parent with a similar name. A DLP policy tip blocks the send. Later, a staff account signs in from an unfamiliar country, risk-based Conditional Access forces a secure password change, and the head teacher never rings you at home.
Insider threats in Office 365: gotchas
Role groups. Global Administrators can configure a lot, but they can’t see Insider Risk Management alerts without an analyst or investigator role group.
Triggering events. A user in scope isn’t scored until a triggering event happens, such as a resignation date or a high severity DLP alert.
Guest accounts. Insider Risk Management policies don’t support guests, so lean on access reviews and DLP for external users.
Data risk graph. This investigation view is due to retire on 24 November 2026, and it doesn’t work with anonymised usernames anyway.
App consent. A malicious insider with consent rights is a problem, so restrict user app consent.
Leavers. Insider threats in Office 365 peak around leaving dates, so automate offboarding with Lifecycle Workflows if you have the licence.
Should you bother with Insider Risk Management?
If you have E5 or Microsoft Purview Suite, yes. It is already paid for, and the departing users policy catches more data walking out of the door than any number of “please don’t” emails.
If you don’t, you can still handle most insider threats in Office 365 with E3 or Business Premium. Conditional Access, DLP for email and files, blocked forwarding, audit and the PowerShell check get you surprisingly far.
If you only do three things this week: block external auto-forwarding, publish one DLP policy with policy tips, and move every admin into PIM. Then check the audit log weekly, like the backups (you do check the backups).
Insider threats in Office 365 FAQs
What are insider threats in Office 365?
Insider threats are risks caused by people who already have legitimate access to your Microsoft 365 data, such as employees, contractors and partners. They include accidental, negligent and malicious users, plus compromised accounts used by an attacker.
Which licence do I need for Insider Risk Management?
Microsoft 365 E5, Microsoft Purview Suite (formerly Microsoft 365 E5 Compliance) or the Microsoft 365 E5 Insider Risk Management add-on. Education and government equivalents also exist.
Does Insider Risk Management show the user’s real name?
Not by default. Usernames are pseudonymised in alerts and cases, and an admin can change this under Settings, Insider Risk Management, Privacy.
Do I need an HR connector for the departing users policy?
No, it is optional. Without it, the Data theft by departing users template can trigger when the account is deleted from Microsoft Entra ID, which is later than a resignation date.
How do I find mailboxes forwarding email externally?
Check ForwardingSmtpAddress with Get-EXOMailbox, and ForwardTo, ForwardAsAttachmentTo and RedirectTo with Get-InboxRule -IncludeHidden. The Auto forwarded messages report in the Exchange admin centre also helps.
Are ID Protection risk policies still supported?
The legacy user risk and sign-in risk policies in ID Protection were scheduled to retire on 1 October 2026. Use risk-based Conditional Access policies instead, which need Microsoft Entra ID P2.
Further reading
- Get started with Insider Risk Management (Microsoft Learn)
- Help mitigate risks with Adaptive Protection (Microsoft Learn)
- Control automatic external email forwarding (Microsoft Learn)
- Configure and enable risk policies (Microsoft Learn)
- Intune Endpoint security: what each blade does
- Shadow AI in Microsoft 365
- PIM for Groups
Found this useful? Buy me a coffee, and if you handle subject access requests, have a look at Redact Ninja for redacting PDFs without sending files to a server.
Tags: Cybersecurity, insider threats
[…] Check out this article Insider Threats in Office 365: A Practical Guide […]